How to Install an EV Charger Wall Plug at Home?
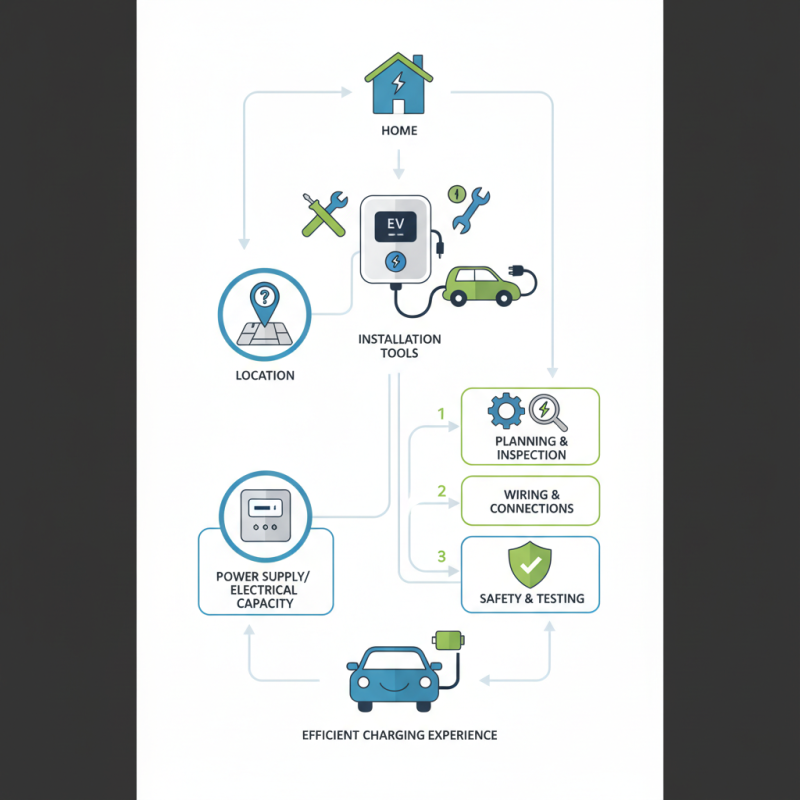
Installing an Ev Charger Wall Plug at home can seem challenging. However, with the right approach, it can be manageable. Many homeowners are making the switch to electric vehicles. As a result, charging at home becomes essential. The EV Charger Wall Plug offers a convenient solution for this need.
Before beginning the installation, it's important to consider factors like location and power supply. Finding the right spot for your EV Charger Wall Plug can make a difference in usability. It's also wise to check your home’s electrical capacity. Many people overlook this step, leading to potential problems later.
While the process may appear straightforward, some details can pose difficulties. For instance, ensuring proper wiring is crucial. A loose connection can lead to inefficiencies. Take your time and inspect all components thoroughly. Reflect on each step, and don't rush through the installation. With patience and attention to detail, your electric vehicle charging experience will improve significantly.
Understanding the Basics of EV Charger Wall Plugs
Understanding the basics of EV charger wall plugs is essential for every electric vehicle (EV) owner. These chargers provide a convenient way to power your car at home. Generally, there are two levels of chargers: Level 1 and Level 2. Level 1 uses a standard outlet and is slower, while Level 2 offers faster charging through a dedicated circuit. Consider your needs when choosing the right one.
Tips: Assess your daily driving habits. Do you need a quicker charge at night? Maybe a Level 2 charger is better for you. Installation requires a proper electrical setup, so consulting a professional is usually wise. Be aware of your home’s electrical capacity to avoid overloading circuits. Improper installation can lead to system failures.
Not all homes are equipped for EV chargers. Some may need electrical upgrades, which can complicate the process. It's important to familiarize yourself with local regulations and codes. Ignoring them could result in significant hurdles later. Additionally, think about where to install the charger. Proximity to your parking spot can save you time and hassle.
Choosing the Right Location for Your EV Charger Installation
Choosing the right location for installing your EV charger is crucial. According to recent industry studies, about 80% of EV charging occurs at home. Hence, selecting an ideal spot significantly impacts convenience and efficiency.
Consider placing the charger near your parked vehicle. A wall plug close to your garage or driveway minimizes cable length, reducing potential trip hazards. Aim for a spot with a dedicated circuit to handle the electrical load. Ensure it’s sheltered from extreme weather for long-term durability.
Tips: Always check local building codes for compliance. Consider user-friendly designs that allow easy access.
Lighting is essential too. A well-lit area improves visibility while connecting your EV. The National Renewable Energy Laboratory suggests that proper outdoor lighting can enhance safety during nighttime charging. Reflecting on your installation can lead to better placement decisions. Assess your home layout carefully before finalizing the site.
EV Charger Installation - Preferred Locations
Gathering Necessary Tools and Materials for Installation
Installing an EV charger wall plug at home requires careful planning. Gathering the right tools and materials is the first step. You'll need a power drill, screws, and a level. A circuit tester is also important to ensure safety. Many reports indicate that approximately 80% of EV charging occurs at home, making installation a practical choice for many homeowners.
It's crucial to assess your home's electrical system. A dedicated circuit is often needed to support the charger’s power requirements. According to industry standards, a Level 2 charger may require a 40-amp circuit. This may mean hiring an electrician. Drawing from a recent survey, around 30% of DIY enthusiasts face unexpected challenges during installations. Common issues include inadequate wiring or improper circuit capacity.
Consider your installation location carefully. Ideally, it should be near your parking area. Wall-mounted chargers need a sturdy structure. Remember, aesthetics matter too. A well-placed charger can enhance the appeal of your garage. Ultimately, preparation is key. Identify potential obstacles before starting the installation process. Having the right tools and materials will ease the overall experience.
How to Install an EV Charger Wall Plug at Home? - Gathering Necessary Tools and Materials for Installation
| Tool/Material | Description | Quantity | Estimated Cost |
| EV Charger Wall Plug | The charging unit for your electric vehicle. | 1 | $500 |
| Circuit Breaker | Protects the electrical circuit. | 1 | $40 |
| Electrical Wiring | Wiring to connect the EV charger to the circuit. | 50 ft | $100 |
| Mounting Bracket | Used to secure the charger to the wall. | 1 | $25 |
| Drill | For making holes in the wall for mounting. | 1 | $70 |
| Screws and Anchors | Fasteners to secure the charger and mounting bracket. | Pack of 10 | $5 |
| Level | To ensure the charger is mounted evenly. | 1 | $15 |
Step-by-Step Guide to Installing Your EV Charger Wall Plug
Installing an EV charger wall plug at home can be a rewarding project. Before you begin, gather the necessary tools. You will need a drill, a level, screws, and possibly a conduit. It’s essential to review your electrical system to ensure it can handle the additional load. You might realize that some rewiring could be necessary.
Start by selecting a suitable location. Ideally, place the charger near your parking area. Make sure the area is dry and easy to access. Use a level to mark the drill holes. This step is crucial; uneven mounting can lead to issues later. Once drilled, secure the mount with screws.
Next, connect the wiring to your home’s electrical panel. This is where safety must come first. If you’re uncertain about the wiring process, consult a professional. Mistakes here can be costly.
After wiring, attach the wall plug and ensure everything is secure. Double-check all connections before powering on. You may find that some parts don't fit perfectly. Don’t be discouraged; adjusting your approach is part of the process. Lastly, test the charger with your vehicle to confirm it works correctly. It may take a few tries to get everything right, but the effort will pay off in the long run.
Safety Tips and Best Practices for Using EV Chargers at Home
When installing an EV charger wall plug at home, safety is paramount. Ensure the area around the charger is dry and free from clutter. Inspect your electrical panel before installation. Confirm it can handle the additional load. A professional electrician may be needed to assess your setup thoroughly. This step is often overlooked but crucial for safety. The right installation prevents potential hazards.
Using an EV charger requires a few precautions. Always use a weatherproof cover if your charger is outside. This minimizes water damage risks. Regularly check the charger for signs of wear or damage. Frayed wires or corrosion can lead to serious issues. Handle cables with care to avoid accidents. Consider labeling the charger to remind users of proper usage. Taking these extra steps helps ensure a safe charging experience.